Thursday, 27 January 2011

review an Auteur

kihachiro kawamoto


Born in Tokyo, Kawamoto became entranced by puppets as a youngster after being shown how to make them by his grandmother. He made figurines of popular stars of the day and staged them in dramatic tableaux. Despite being an avid movie fan, he originally had no plans to make a career out of his hobby. in 1944 Kawamoto graduated from Yokohama national university but remained stationed in japan for the remainder of the second world war.


Historian Brian Sibley sees the work of kihachiro kawamoto as uniting "the European approach to puppet filmmaking with the ling tradition of puppetry in japan, which dates back to bunraku puppet plays first presented in the seventeenth centry." This is partly because kawamoto trained in eastern Europe he went to Prague to study with jiri trnka after seeing the great Czech animator's Cisaruv Slavik (the emperor's nightingale, 1949), and spent some years working in Hungary, Poland, Romania and Russia. He returned to japan in 1965, where he produced animated films using puppets and other techniques. in his films, puppet figures take on the mannerisms of live performers.


His short films include Oni (the demon, 1972), Shijin no shogai (a poet’s life, 1974), Kataku (house of flame, 1979) and the book of the dead. (a link to more of kawamoto animations http://www.watershed.co.uk/kawamoto/film_clips.html )


Creating a puppet for these films took about 10 days. Particular care was taken with it most detailed features such as heads, hands, eyebrows and even teeth. Most all of his puppets he used were made from plaster mold. For just ten minutes of animation, one year of preparation was required.


The reason I chose this auteur is his style of stop-motion animation. Kawamoto animation are very detailed to give them a realistic view and have the characteristics of real life actors, making the animation seem more real. His style of story-telling is very colourful giving the background ad characters a light and bright colours, but also having a dark story telling of ghost and monsters putting fantasy and in a darker scene.


Information providid by: 'The Animation bible', Wiki, YouTube, The Guardian

Wednesday, 8 December 2010

Sound animation assessment

15th of November 2010 (week1)

Last week we were given an assignment to use soundtracks will be given in class to create our own animation. My plan is to divide the week so I have into designing the storyboard using the dope sheet make the rough animation and finish off with the final animation.

Week 1
Week2
Week3
Reference, research, planning out, storyboard and dope sheet
Quick sketch animation and testing
Lining (colouring possibly), final animation and final review


For my references I have been looking on the Internet and using my book of cartoon animations to get an understanding of the characters I will be creating for my animation. At first I looked for characters that were complete opposites to gain understanding of design for my own characters but went into a bit more depth finding characters not only of opposites but sizes. From that I design my characters making one my characters loud, annoying and small while the other large, shy and timid.

My idea for this animation is purely based around a simple and common plan where a small grey squirrel and a chipmunk fighting. A small squirt is grouchy, quick-tempered and restless and slightly paranoid while the other character a chipmunk is slow, easy-going and slightly jumpy. For these two characters I have been designing references to suit their voices from the audio to the characters as well as research on the animals they are based on.

From the audio I created a story that was interesting, funny, and very over exaggerated movements with that in mind I listened over the audio to get a story based. From what was given to me in the audio I started off with creating a fight scene between the two characters where the squirrel believed that the chipmunk had stolen something from him. After a couple of sketches later I decided to make it more interesting by using the end line said in the audio in different contexts instead of it being the chipmunk this world turns around and point at a person behind them believing he stole it.

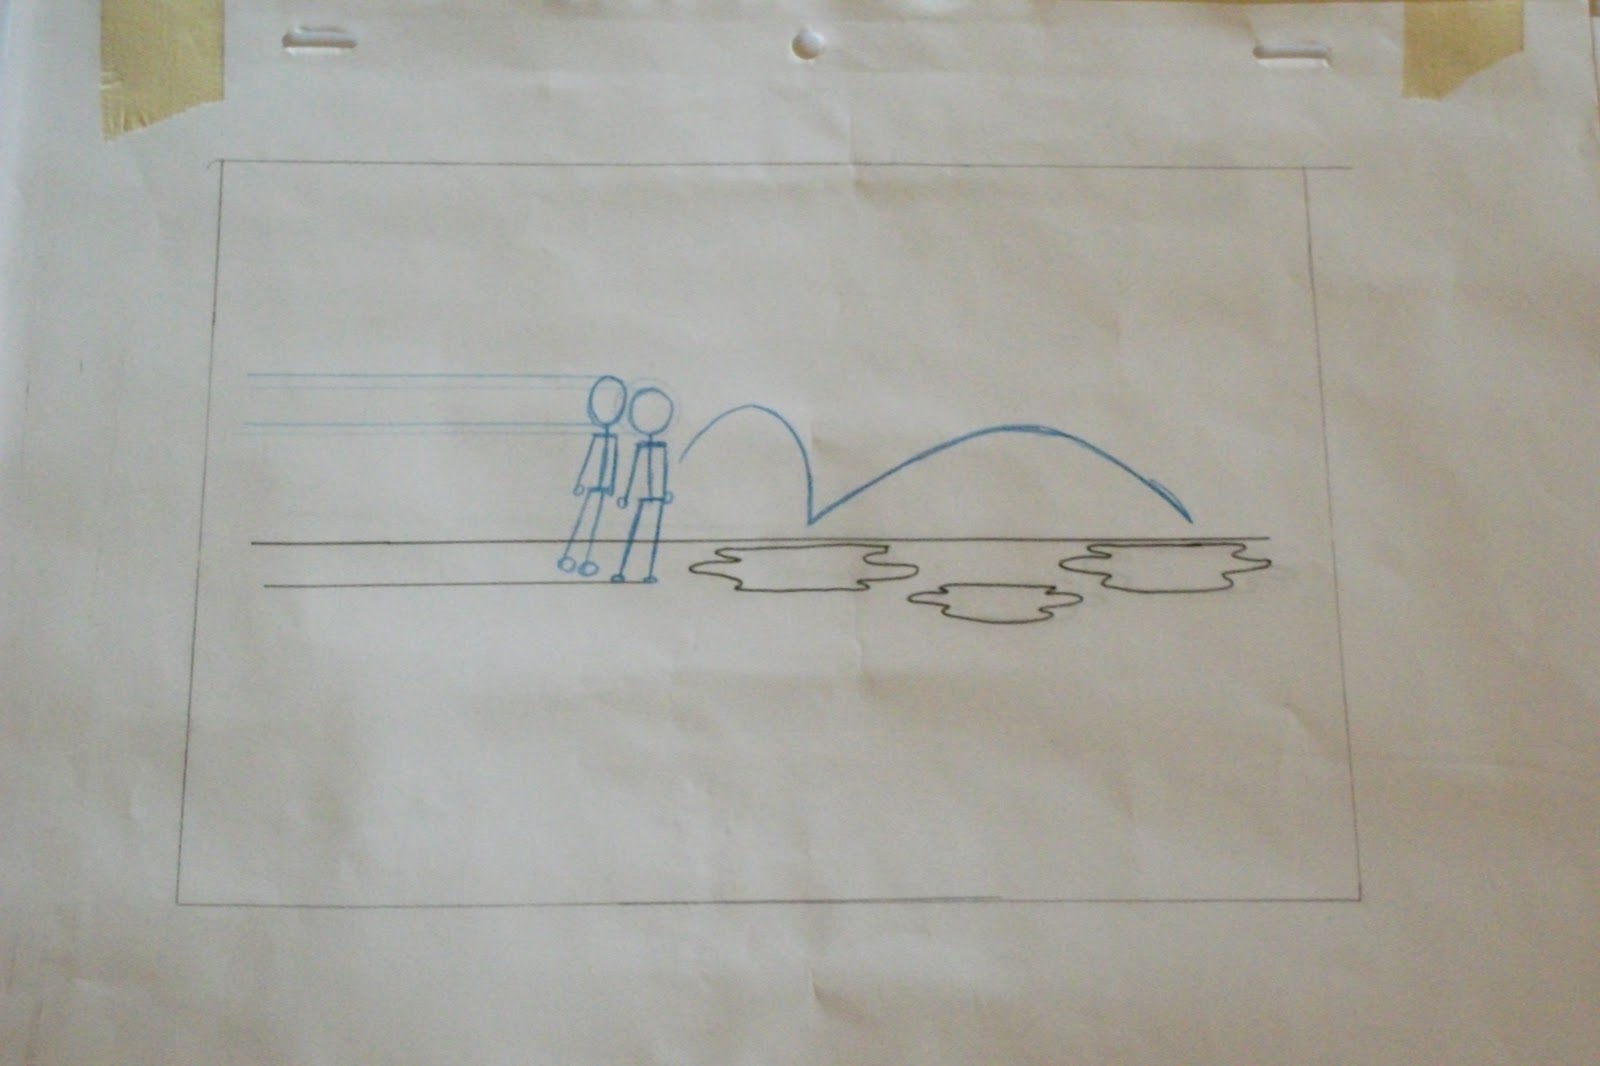
After creating my storyboard and animatic I then began planning out my dope sheet. From the audio I counted out how many frames I would need to pronounce certain words and sentences and then cut scenes up. This is my first time using a dope sheet and though it was confusing to use I have a certain amount of understanding on how worked.

Before moving on to making the rough sketch of my animation I first acted out the scenes that were going to happen within the animation first to see if they fitted. From acting out scenes with another person to help me I was able to get a better understanding of what to do within the scene to make it more realistic still over reacting movements from the acting I got an idea which I would add to one of the scenes of my animation.
 
22nd November 2010 (week2)

after doing the references and getting the research needed for my animation I then moved on to creating quick sketches of the animation testing before lining it for the final project. After watching the animation test I realise that I created too much of a long gap in one of the scenes and realised their mistake. To see what I could do to fill in the long gap I went back to my storyboard and thought out what would feel it in from this I used one of the scenes as the starter by the characters were taught to come forth to each other. After doing a second test with the new scene in giving its a check over I decided to move on to making the final project of the animation.


 first animation test

29th of November 2010 (week3)

In the end result I was quite pleased with how everything turned out the lining I added to the animation made more distinct and stands out as well as the acting that was put into the animation to give the characters more movement. From this animation I have learnt much about using a dope sheet in planning ahead before going into the final result from it I created a believable scene that I believe was creative and funny as well. There were some things that I wish I could have done to this animation such as creating to be more fluent and had better timing with mouth movement.

Two genres assessment

Fantasy genre from Peter Pan


The story from Disney's Peter Pan is about three children who do not want to grow and meet a boy named Peter Pan who wants to help them by taking them to a world called Neverland. When the three children and Peter Pan returned to Neverland bear in a world unlike any other with mermaids Indians Pirates hideaways made out of trees and adventures like no other.

visual:

  • mythical creatures
  • bright colours
  • storytelling beginning
  • fantasy world
  • flying
  • fairies
  • treasure
  • rhyming
  • anthropomorphic
  • amazing treehouse
  • imagination
  • amazing battles


Sounds:
  • tingling bells
  • fluteplaying
  • violins


Sport and comedy genre from wacky racers

Wacky races a TV show about a group of very different characters racing to to win. In the TV show so many different characters with many different abilities attached to their vehicles using Bandon and inventive weapons to make it funny and interesting.

Visuals:
  • Vehicles
  • different characters
  • Racing track
  • commentator
  • slapstick
  • racing
  • trickery
  • Road
  • trophies
  • finish line/start line
Sound:
  • engines noises
  • fast sounding music
  • different theme songs


Wednesday, 24 November 2010

Rotoscoping


As animation style used to this day rotoscoping invented by max Fleischer was a way to capture real life motion and use it in animation. When max Fleischer created this style of animation he used it to make the cartoon ‘Koko the clown’ the very first to use rotoscoping.


The rotoscope of the time was a very simple design using a film projector at one end of a well-placed drawing desk the animator would trace over the persons form frame by frame until the end result was a smooth life-like movement.


In august 9th, 1930 another animation would also use rotoscoping to create a realistic style dance.  The character by the name Betty Boop appeared on a cartoon show called dizzy dishes. At first she was designed to be a poodle but as time passed she soon became a fully human character. Through out the 1930s she became known face for her interesting look and have very unique accent.

In Betty Boop in Minnie the moocher before the cartoon starts the viewers watch Callaway (the dancer) perform showing off his skills in dancing. As the cartoon begins it tells a story of how Betty is getting told off which makes her unhappy and so runs away from home, at this point there is no rotoscope used but recycled animation (like walking, crying etc). As the cartoon carries on betty and her friend bimbo find a cave where they meet a ghost walrus, at this point the rotoscoping is used as the ghost walrus starts dancing. The dance movements used to make the character dance were the same movements done by Callaway before the animation started. From this animation I enjoyed how they used the rotoscoping style to make the character move but yet not having a human character


Throughout Walt Disney's years in 2-D animation they used rotoscoping not just to get an understanding of the body and movement but also using it in their own animated movies. One of their most well known animated movies, which used rotoscoping, was Snow White and the seven dwarfs. The rotoscoping was mainly used on snow white for particular scenes for example when she is dancing with the Prince.
Snow White and the seven dwarfs were the first feature film that Walt Disney was planning to develop as they wanted to go into more detail than their short projects that as Mickey Mouse and the silly symphonies series from this Disney was planning to expand their out let by moving into features. Snow White and the seven dwarfs being their first feature length film had a budget of $250,000 that was 10 times the budget of an average silly Symphony.
Finally when the movie was released in 1938 Snow White and the seven dwarfs was a box office hit bringing more then $200 million internationally.


Rotoscoping was used extensively in China's first animated feature film Princess iron fan 1941. The inspiration for the film Princess iron fan came from Disney's own rotoscoping animation Snow White and the seven dwarfs. For Wan Chaochen and Wan Dihuan it was to set the standard and attempt to create a film equal quality to form the nation's honour. The firm to 3 years to June 30 seven artist and ¥350,000 (approximately £2635) to make although the Disney influence distinct in much of the animation there is also a distinct Chinese style in the film a style that would grow much stronger with the Wan brothers. Subsequent films in the following decades rotoscoping was an extensively to save money and the eyes of the live action are often visible in the face of the animated characters. This animation would render past 20,000 frames, using up more then 200,000 pieces of paper.


It was also used extensively in the soviet union where it was known as eclair from the late 1930s to the 1950s it is still a call use was in force as a realisation of socialised a realism most other films produced with it were adoptions of folk tales and poems for example the nightmare before Christmas or tales of the fishermen and the fish only after the 1960s did animators start to explore very different ideas.
Another type of animation that used rotoscoping was a music video for a song from a-ha called take on me in 1985 this register animation used all of the real live action within the animation.
In all rotoscoping was an effective yet long winded way to get perfected movement and live action in animation and from these animators have learnt movement of character which can be used in cartoons made less realism


As 2d animation began to die down in popularity a new form of animation would make way for a new aspect on the style of rotoscoping. 3d animation became the new style of animation using less drawing and time it became the best way to make animation, but like all animations it had a hard time capturing real life motion.

In 2002 the movie Lord of the Rings: The two towers the new style of rotoscoping would be used to design and animate a character known as ‘Gollum’.  Weta digital a digital visual effects company based in wellington, New Zealand. Began animating Gollum in late 1998 to convince new line they could achieve the effect. Andy Serkis “played” Gollum by providing his voice and movements on set, as well as performing within the motion capture suit later on. His scenes were filmed twice, with and without him. 


Originally Gollum was set to solely be a CG character, but Jackson was so impressed by Andy Serkis’ audition tape that they used him on the set as well. Gollum’s CG model was redesigned during 2001 when Serkis was cast as Sméagol (Gollum's former self), so as to give the impression Andy Serkis as Sméagol transforms into the CG Gollum. The original model can still be glimpsed in the first film. As it was easier to have an actor to perform with in the scene then a CG character the animators in the end rotoscoped the CG Gollum and animated on top of these scenes.


This type of rotoscoping used a more complex way to capture real life motion. The actor would wear a ‘motion capture suit’ this suit has markers or balls that display the parts of the body they are attached to giving the character a form to base on. When the character is designed and made the animators line up the parts of the body to the right area so that the character moves in sync leaving a character with a life like movement with 3 dimension angles.

From what I have learnt from rotoscoping is that to capture true real life motion has a lot of pros and cons giving the animator a chose to make the animation as real as possible or over exaggerate on parts that my be comical or action packed, and that rotoscoping though not used as it was before to make 2d is still used to this day in animation and illustration in 3d and digital programs. 

Videos and refferences:


Monday, 8 November 2010

Dodo curiosity animation

For this task I was given four weeks to design, plan out, storyboard and draw an animation that is less then 20 seconds long. The first part of my task was to get a simple but effective character which I would use for this animation, I wanted to use a character that uses squash and stretch effect while walking as well as giving a simple walk cycle. After a couple of designs and storyboards later I finally decided to use my character the Grim Dodo
before planning out my storyboard I did a small reference sheet of the character so that I could get a more defined look at what the character may turn out in the final result. After designing my reference sheet I then moved on to my storyboard, in the storyboard I planned out a walk cycle before reaching the main phase of the animation. In the main phrase the character first walks past the button before returning to it he then presses a button and wait for something to happen only to get knocked on the head by a small anvil.

When it finally came to drawing out my animation there were some things that I had to cut from my final project, one of the things I had to cut from my animation was the first walk cycle before the character gets the main phrase because it took up too much time. Another part of the storyboard I had to cut from the final animation was the dramatic scene where the character with get hit by a larger anvil. Although I was not able to use the walk cycle in the main phrase I still use the idea of how the character would walk from it in the main phase
within the main phase of my drawing for the animation they used a set frame and an outline to keep a consistency within my animation as well as using tracing paper in my own techniques to keep the walk cycle consistent as well.
In my end result I was quite pleased with how it turned out and I feel that I gave a fair amount of pause time between each action. In my final result I do wish that I was able to give more detail and designed to the character to show more reaction within the face.

Thursday, 28 October 2010

Anticipation stickman

For this week assignment we had to get an understanding of human figures actions. At first we had to observe someone jumping all leaping to get an understanding of the concept, after a couple of still drawing to see how the human body gets ready to jump we were given the task to create a stick man using the anticipation in jumping or leaping.
First I chose the scene I was going to use then see if I could simplify the scene to make it easier to animate. My first idea was to do two stick coming across some puddles. After planning out the storyboard I realise that two stick men would be a difficult task as both may cross path and become harder to differ for each other, in the end I decided to use one stick man for this animation.
After planning out my storyboard I went out to design a set frame so that my animation would stay within the line limit, after that I then designed the background and objects that would be in scene so that I can keep consistency within my animation. It may end result I was quite pleased with how it turned out although there are some flaws in my timing of the animation I was able to get all of the scenes I wanted.

Thursday, 14 October 2010

bouncing ball animation

For this of animation I had to animated a ball that uses the squash and stretch technique. At first I planned out what was going to do for my animation and after doing research on the Internet of different types of bouncy balls I decided to go with a ping-pong ball for my animation.
For more research I decided to record myself dropping two different types of balls to see how they would react when they hit the floor. One of the balls bouncing ball had more velocity as it was coming back upwards unlike the other ball a small tennis ball which he lost its velocity as it hit the floor.

 What would happen in the animation is the ball would bounce off the bottom of two cups, off a wall and then go into a cup. To keep the ball and other objects consistent I used a template which I placed behind the paper. The only thing I'm not happy about in my animation is that I was not able to keep the cup size consistent and so they look as if they are pulsating. from this animation I've learnt to get an understandingon the bounce and stretch technique and also to work on my timing on my animation. 

Thursday, 7 October 2010

(Rough) old man's expressions

Here is a rough finish of my animation which I've titled the old man's expression. The technique I used on this animation was the double take or two frames to give it a longer and more paused the fact when it got to the expressions. First I planned out the shape of the characters face then I chose the expressions which the character was used in the animation, I chose neutral to shocked and angry then ending on neutral again.

This animation is fairly rough and I will update to a better quality animation at a later date but until then I'm going to use this rough for now. I'm really happy how the animation turned out and once I get a rough sketch finished.

Friday, 1 October 2010

group flipbook animation

For this flipbook animation we had to work in a team of five and come up with a unique animation that could be played in a repeat of the loop. When we first started we talked about how all of our animation is could come together as one, after a while we decided that the way we were going to link all of our animation together was make the character jump into different scenes using different elements that we added (for example the character would jump off a diving board in the land in the water allowing the switch).
My task was making the character jump off a diving board into the water at first I thought it would be quite difficult but near the end of the animation became easier to understand.

In all I really enjoyed how the group animation turned out.


my flipbook Animation

This was my first time at making a flip book animation. For my flipbook animation I wanted to try my hand at making an animation that uses the squash and stretch technique to test my skills. As I was drawing out frame by frame I found it difficult to keep in line with my previous frame before, but in all I was quite pleased with how it came together.
My only regret is that I was not able to keep the flipbook still enough when I was putting me animation onto the computer.